Usually, the main thing to worry about when full length resizing rifle brass is simply setting the die to get sufficient sizing, either for your specific chamber, or to get minimum sized brass that will function in nearly any chamber. There are some situations that can arise that are unexpected, however.
In the ideal situation, the brass is uniformly resized, with the shoulder pushed down to the point where the headspace "datum line", an imaginary line about half way up the shoulder, is the desired distance from the base of the brass. SAAMI publishes this specification, so if you want brass that will function in any gun, you simply push the shoulder down to the minimum dimension by setting the die lower. Some dies can't size all the way down to SAAMI minimum because of the way they are cut. They will bottom out on the shellholder before making the headspace that small. If your die is bottoming out hard on the shellholder and still not sizing the brass enough for easy chambering, try a different brand of dies or call the manufacturer for a "shallower" die that can size further. Another option would be to remove a little material from the top of your shellholder, allowing the die to go further onto the brass.
Some calibers with steep and long shoulders can not easily be resized back to the SAAMI minimum, because the shoulder will tend to collapse. In this case, you should resize the brass for your gun and just be aware that your reloads may not function in other rifles.
If a case gauge such as the Sheridan or Wilson indicates that your sizing is sufficient, but you are still having problems, it may be one of the rarer issues described in this article.
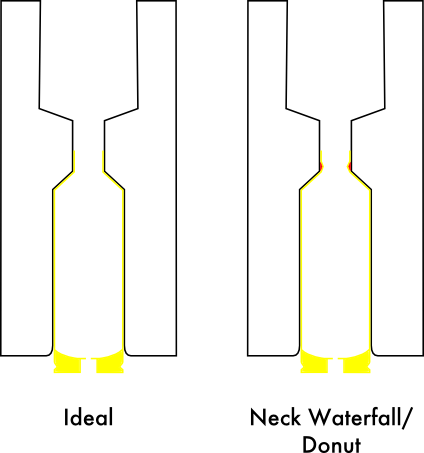
When brass is forced to flow a large amount, such as when forming 300 blackout from 5.56, forming wildcat calibers, or when resizing brass shot in a blow back action (such as FN 5.7x28mm), it can form a "donut", a dent all the way around the base of the neck where it meets the shoulder. I like to call this the "waterfall effect", because I think that's a good way to describe what is happening. The brass flowing up the shoulder face of the sizing or forming die will tend to push inward on the bottom of the neck section, creating the "donut". This most often happens with brass that has been pre-cut before extensive forming.
There are a few ways to avoid this. Using a sizing die that has a neck expander ball will often flatten the donut back out, however this adds stress to a critical part of the case near the shoulder that is already prone to cracking. Another way to avoid this is to progressively size the brass using a rough forming die. GSI Blackout forming dies are a two die set, with one roughing die that helps avoid this issue. To be effective, the roughing die should place the shoulder very close to its final position, albiet with an oversized neck section. Forming the shoulder in stages like this prevents both donut and shoulder collapse. A rough forming die for this purpose is equivalent to a full length sizing die, with the neck reamed to a much larger dimension, and could be created from a standard full length sizing die.
Another way to minimize the effect is to not pre-cut the brass to a rough length when doing initial forming to a new caliber. Leaving the head on 5.56 during initial sizing to 300 Blackout, for example, will minimize this issue. My theory on why this helps is that the additional brass provides support that helps prevent the donut from forming in the first place.
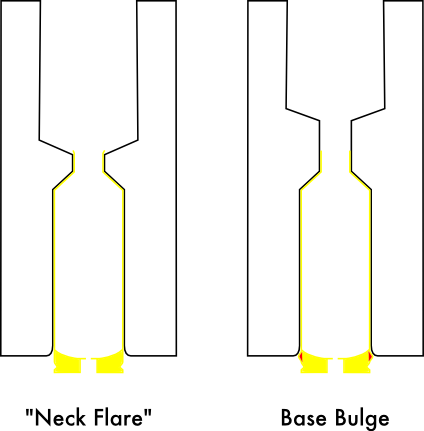
There is a lot of variation in the construction of sizing dies, but the basic design is the same, a reamed, cartridge shaped section, and an open section above the neck. If the length of the brass is longer than the neck section of the sizing die, the protruding brass will have a tendency to flare out. Removing the top parts of the die and running a case into it will allow you to see if the case mouth is protruding from the sizing section of the die. One would think that this flare effect would be mashed back in as the case is withdrawn from the die, but it often is not. This flare is usually less uniform than an intentionally flared mouth.
To prevent unintentional mouth flare from the sizing die, either trim the brass shorter or get a die with a longer neck section.
There is a lot of talk on the Internet about "small base" sizing dies, whether they are necessary, or good. The name is misleading, because no normal resizing die sizes the base of the brass. As the illustrations show, the bottom of the die is rounded, and much of the base is in the shell plate. Most dies will only size to within about 1/4th inch of the base of the brass. If the head of the brass is expanded or flowed due to overpressure, loose chambers, or both, then a standard die, or even a "small base" die can't do anything about it. This effect, when pronounced, will often leave a visible ring on the brass near the base. The presence of a ring does not necessarily mean that the brass has flowed to the point where it will not chamber, but it is a sign that the brass has begun expanding in the section that a sizing die can't reach.
There are "push through" dies which are cut in a simple cylindrical shape that can resize the base of the brass, but no other part. The only other commonly available option is a roll sizing machine. In theory it should be possible to resize bases in the way that shotgun loaders do, with a collet system, however I have not seen such a system available for pistol or rifle brass. The force required to do collet sizing on the base of rifle brass would be somewhat large.